Assigning categories to quizzes themselves is pretty much straightforward since the quiz custom post type in LearnDash supports Quiz Categories as a taxonomy of the custom post type.
The problem arises with Quiz Questions because Question Categories are handled differently. They are not taxonomy of the custom post type, so you cannot select them with a direct approach as you would expect.
Simply put, there is no default way to add Question Categories via the Bulk Actions edit option.
The solution?
A plugin I created a couple of weeks ago called Bulk Edit Questions Category for LearnDash.
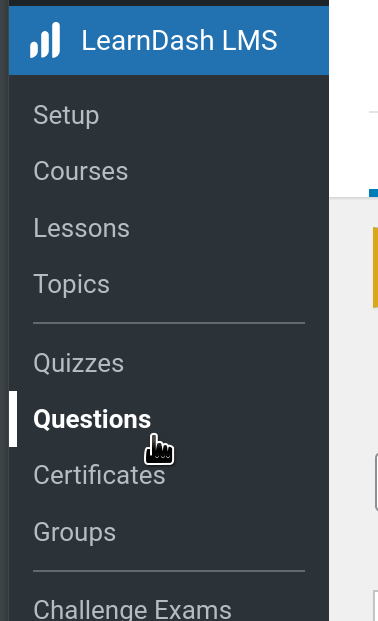
In short, after installing the plugin, go LearnDash LMS > Questions and select any questions from the list of questions.
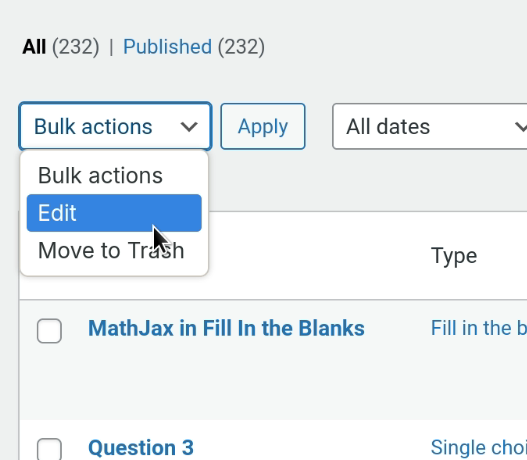
In the Bulk Actions drop down select Edit and then click Apply.
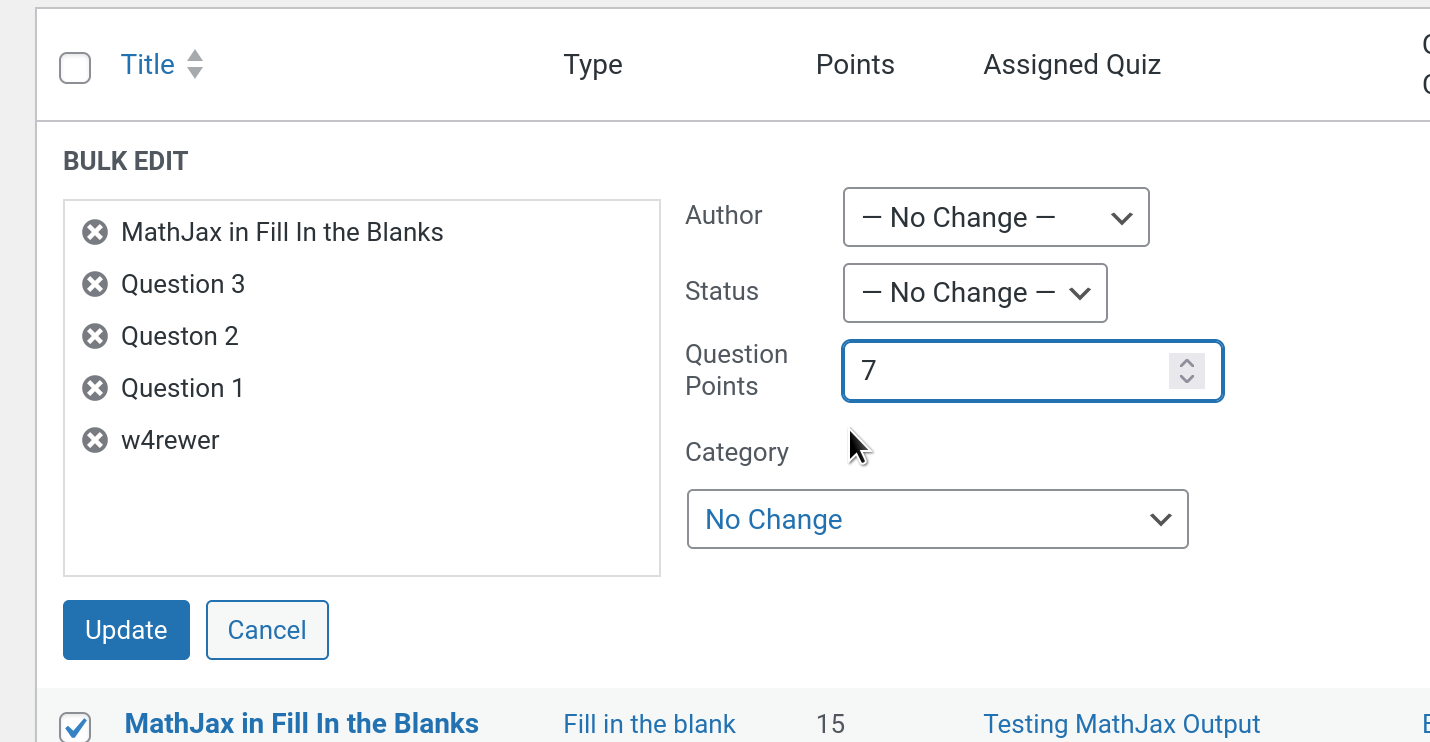
When the bulk actions panel expands, in the Category field select any the desired category you want to set for the selected questions then click the blue update button.
After the page reloads you’ll see the new category is correctly assigned to the questions previously selected.
A couple of weeks ago I came up with the idea of designing a way to Bypass Drip Content in LearnDash in an simple way on a user per user basis and that also allows the user to mark the bypassed drip content as complete.
The Problem
Drip Content in LearnDash allows you to stop users from accessing a lesson immediately after they enroll in a course and sets them to wait for a certain period of time you configure in the lesson’s settings.
But there might be a case where you want to exclude some users from the drip content rule and grant them immediate access. Let’s you have a course that sells for $97 and every lesson is available every 7 days from one another.
Then say you want to offer a premium version of it at $297 and between the premium benefits give the users full access to all lessons at once.
To bypass drip content for LearnDash right now you’d need to either do a complex setup with a CRM and an automation tool like Zapier, Pabbly, WP Fusion, or change the user’s enrollment date manually for each user.
The Solution
The plugin I came up with Bypass Drip Content for LearnDashhelps you bypass drip content on a lesson by lesson basis, picking users one by one or including users from a group at once (supports multiple groups).
Essentially, LearnDash LMS allows you to drip content by setting a release time in the Lesson Release Schedule option. You can access this option in the Lesson Settings. There are two ways to reach the Lesson Settings:
Go to Lessons in the WordPress admin and select a lesson from the list. After selecting the lesson and the lesson edit screen loads, click the Settings tab at the top left area.
Go to Courses in the WordPress admin and select any course. After selecting the course go to the Builder tab at the top menu. In the Lesson list below in the course builder, expand the Lesson you want to edit and click the Edit link.
No matter what process you choose, after selecting the Lesson, go to the Settings tab like so:
The Lesson Release Schedule option is the third option inside Lesson Access Settings:
You have three modes:
Immediately – this enables access to the Lesson immediately (no drip).
Enrollment-based. The lesson will be available X number of days after the user enrolled in a course.
Specific date – The lesson will be available on a specific date regardless of the date the user enrolled in the course. If the current date is greater than the date specified in the “Specific Date” option, then the user will be granted immediate access.
After setting the Lesson Release Schedule for your lessons, the course content is now on a drip row.
To bypass drip content, LearnDash has a filter ld_lesson_access_from__visible_after.
This filter accepts three arguments, $lesson_access_from, $lesson_id, $user_id.
$lesson_access_from – The timestamp when the Lesson becomes available.
$lesson_id – The lesson post ID in WordPress.
$user_id – The user ID in WordPress.
You can set the filter to return 0 or the output of the PHP time() function and that will suffice to bypass the drip content like so:
But what about bypassing drip content for specific users, and ignore the remaining users?
That’s where Bypass Drip Content for LearnDash comes in handy.
Sure you can do your own logic making an array of user IDs then mapping that array with the current logged in user, etc. That’s basically what the Bypass Drip Content for LearnDash does already for you.
After installing and activating the plugin on your LearnDash website, go to the Settings tab in the lesson you want to enable bypass drip content and you’ll see the following at the very bottom of the Lesson Settings screen:
Click the radio switch to Enable Bypass Drip Content.
Then you’ll see two options get expanded:
Select Users to Bypass – Allows you to select specific users allowed to bypass the current lesson.
Select Groups to Bypass – Allows you to select groups. All members of any select groups are allowed to bypass the current lesson.
LearnDash, by default, has different enrollment types: Open, Free, Buy Now, Recurring, and Closed.
When you set a course access mode to Open, any user account registered on your website will be automatically enrolled in that course.
Non-logged-in visitors will simply see all the course content. Just LearnDash won’t track any progress as there is no user account to assign the course completion yet.
With the remaining access modes, your users must complete some action in order to enroll in the courses.
The advantage is that not everyone will be part of the course, allowing you to keep a cleaner record of the enrolled users.
The disadvantage is that it may create friction.
Going on a different route, let’s say your online academy is receiving deal offers from related brands that have the potential to have a significant and positive impact on your business.
And let’s say that part of the deal is to allow access to a set of courses ‘for free’ to employees of that brand.
But this set of courses is Buy Now or Closed, and there is no clear way to make a frictionless enrollment process for the specific group of users.
You could create a free group that allows automatic access to any user who enrolls in it for a specific set of courses.
The problem with that is that even as hard as you try, with the base LearnDash setup, any user on the website may run into the group and would have free access to the courses.
That wouldn’t be the ideal outcome.
You could also prevent access to the group with a membership plugin like Paid Memberships Pro, but again, you’d need to indicate what users are part of that membership.
Or you could even manually enroll the users in the group to control who has access to the group and who does not.
An alternative, automated, and frictionless method is to enroll the users in a course or group as they sign up to your website but filter by their email address domain if they are eligible for auto-enrollment.
Saying your deal is with Delta Airlines, whose domain is www.delta.com, check any email address from @delta.com for the account creation. If the email domain matches, then auto-enroll the newly created user in a specific group with ID 5.
The code to achieve that would go something like so:
functionadd_user_to_group_based_on_email($user_id){$user_info=get_userdata($user_id);$email=$user_info->user_email;// Get domain from the email$domain=array_pop(explode('@',$email));// Define your specific domain and group ID$specific_domain='example.com';// Change this to your specific domain$group_id=123;// Change this to your LearnDash group ID// Check if domain matchesif($domain===$specific_domain){// Use the ld_update_group_access function to add the user to the groupld_update_group_access($user_id,$group_id);}}add_action('user_register','add_user_to_group_based_on_email');
The first step is to hook into the user_register action.
That allows you to intercept all user registrations.
Get the user by ID and get the user’s email.
Use a combination of explode and array_pop first to make the email address an array separated by the @ symbol. Then only stay with the last element of the array, which is the actual domain name.
Indicate the domain you want to filter in a variable and the ID of the group you want to auto-enroll the user into.
Then, evaluate the domains. If there is a match, leverage the ld_update_group_access() function provided by LearnDash to update the access for the specific user.
That’s about it. Now over to you.
Let me know in the comments below if you have any questions or if you want to add something.
Depending on your business model, you may allow lifetime access to the course content after your students complete the course.
Maybe so they can revisit the lessons and boost their learning experience.
Or simply as a good will bonus, and allow them to see course updates in the long run.
On the other hand, you can also set an access expiration instead.
LearnDash provides a shortocde [ld_course_expire_status].
In short, it allows you to show your students their current access status. If the access has not expired yet, they’ll see the date until they have access to.
So far, so good.
But what if you want to show them a custom message like “You have 90 days left before your access expires”.
And each time they log into their course the number of days left is reduced accordingly until the expiration.
You’d need to create your own custom solution to show a custom expiration message like that.
So, the logic would work something like this:
Retrieve the access expiration timestamp.
Get the current time.
Calculate the difference between each timestamp in seconds.
Transform the resulting time difference to days.
Evalute if the returned difference is negative, then indicate the course has expired.
Build a default return value including the difference in days.
The code would be something as follows:
functionld_days_until_course_expiration($user_id,$course_id){// Retrieve the timestamp for when the course access will expire.$expires_on_timestamp=ld_course_access_expires_on($course_id,$user_id);// Return a message when the course does not have an expiration timestamp.if(empty($expires_on_timestamp)){return__('Course access does not expire.','learndash');}// Get the current time.$current_time=current_time('timestamp');// Calculate the difference in seconds.$time_difference=$expires_on_timestamp-$current_time;// Convert the time difference to days.$days_left=floor($time_difference/(24*60*60));// Indicate the course has expired if the difference is negative.if($days_left<=0){return__('Course access has expired.','learndash');}// Default message$message=sprintf( _n('There is %d day left before course access expires.','There are %d days left before course access expires.',$days_left,'learndash'),$days_left);/** * Filters the course expiration message. * * @paramstring $message Default expiration message. * @paramint $days_left Number of days left. * @paramint $user_id User ID. * @paramint $course_id Course ID. */returnapply_filters('ld_course_expiration_message',$message,$days_left,$user_id,$course_id);}
You can see in the return statement the returned value is wrapped in the apply_filters() WordPress function.
That allows you to filter the message later.
Let’s say you want to display a custom message when the user’s access is to expire in 10 days.
Maybe to create a scarcity sense and let them know they should renew their subscription.
You can do something like this:
functioncustom_ld_course_expiration_message($message,$days_left,$user_id,$course_id){if($days_left==10){return__('Only 10 days left! Consider renewing or upgrading your course.','learndash');}return$message;}add_filter('ld_course_expiration_message','custom_ld_course_expiration_message',10,4);
The most basic usage, whatever you choice is, is simply echoing the ld_days_until_course_expiration() function like this:
add_action('wp_head',function(){echo ld_days_until_course_expiration('2','7');// Display the access expiration for a user with ID 2 enrolled in a course with ID 7.});
Keep in mind the ld_days_until_course_expiration() function requires the user ID and the course ID you are checking the access expiration status for.
To make it happen dynamically, you can do the following:
Use the get_current_user_id() WordPress function to retrieve the current user ID.
Build a wrapper around get_the_ID(), to get the current post ID if it is a course.
That’s it. Now over to you.
Let me know in the comments if you have any ideas to add, or make any questions if something is not clear.
Focus mode is the way LearnDash allows you to provide your users with a distraction-free interface in your courses.
The Focus Mode was introduced in LearnDash 3.0, and it has been available in all subsequent versions ever since.
In your WordPress admin, go to LearnDash LMS > Settings, and under the General tab, inside the Design & Content Elements meta box, scroll down to the ‘Focus Mode’ option.
There, you can enable or disable the Focus Mode.
LearnDash Focus Mode is a global feature by design. When you turn it on, you are enabling it for all courses without exceptions.
That brings the question: How can you partially enable the Focus Mode?
It would be interesting if you could say what courses should have Focus Mode and what courses shouldn’t have it, right?
In LearnDash, there is no option to enable the Focus Mode for a specific course, though.
There is no way to enable the Focus Mode and then select what courses should be excluded from it either.
A couple of weeks ago, a member on the LearnDash LMS Tips & Tricks group on Facebook made the following question:
Is there a way to enable/disable Focus Mode on a course-by-course basis?
The answer was very clear: No, unless it involves custom development.
That question stuck with me, and I decided to take it up for a challenge.
The short answer is yes; you can enable or disable the LearnDash Focus Mode on a course-by-course basis.
So, it is possible. YEAH!
Let’s dive into how you can enable or disable the LearnDash Focus mode on a course by course basis.
You can enable or disable the Focus Mode globally from the admin, as discussed before.
Behind the scenes, the Focus Mode on/off toggle button in the LearnDash settings page is connected to a value in the wp_options table in the WordPress database.
There is an option called learndash_settings_theme_ld30 that holds as value a serialized array full of options as properties.
One of those values is focus_mode_enabled.
But it actually is not there by default. At least not when you have not enabled the Focus Mode yet.
You may ask, how the heck would you find out about focus_mode_enabled value in the first place?
Scan the LearnDash code base for focus_mode_enabled, and you’ll find a file called class-ld-settings-section-theme-ld30.php inside sfwd-lms/themes/ld30/includes, which contains the focus_mode_enabled option with a default value of zero.
Now, with that information, you can run the following experiment:
Retrieve the serialized option with the WordPress get_option() function.
Place all three snippets in the functions.php file of your active theme, save the changes, and load any page.
In the WordPress admin, go to LearnDash LMS > Settings, scroll down to the Focus Mode option, and you’ll see it is turned off.
Go back to your theme’s functions.php file and set the focus_mode_enabled property to ‘yes’, and save the changes.
$ld30_settings['focus_mode_enabled'] ='yes';
Reload the tab with the LearnDash settings, scroll down to the Focus Mode option again, and you’ll see this time it is enabled.
Brilliant. You have discovered a way to programmatically enable or disable the Focus Mode.
With that knowledge, you can create a custom button in the wpadminbar that switches the Focus Mode on and off without having to go all the way down to the LearnDash settings page.
But that’s it. You still don’t have a way to conditionally enable or disable the LearnDash Focus Mode for a specific course.
However, what you now know is that the Focus Mode feature relies entirely on the value of the focus_mode_enabled option in the database.
LearnDash has some logic in place that looks for the focus_mode_enabled option value.
If it is set to yes, display Focus Mode.
If it is set to an empty string, disable Focus Mode from the view.
You’d need to somehow change the focus_mode_enable option value to yes or an empty string when a user visits a course to either enable or disable the Focus Mode for that specific course.
But then, if you use the method above of changing the option value with update_option(), you would bring a ton of conflicts to your website as with every page load, the option would be turning on and off.
The solution you need is to make LearnDash think the Focus Mode is enabled while it is not.
But how, you ask?
In WordPress, you have actions and filters, globally called hooks. There are regular hooks, and there are also dynamic hooks.
With the option_{$option} hook, you can filter the current value of an option.
For the option holding the focus_mode_enabled property, you’d reference it as follows.
option_learndash_settings_theme_ld30
And then you’d use it like this:
add_filter('option_learndash_settings_theme_ld30','modify_learndash_option_value');functionmodify_learndash_option_value($value){$value['focus_mode_enabled']='yes';return$value;// Always return the value.}
The focus_mode_enabled option is now set to yes globally. Similar to your previous experiment above, go to the LearnDash settings page again, and you’ll see the Focus Mode toggled on.
But is the Focus Mode enabled?
To LearnDash, Focus Mode is enabled. But if you retrieve the serialized option again and do a var_dump on it, you’ll see that the focus_mode_enabled option is not really part of the array:
What you really are doing is intercepting the focus_mode_enabled option value before LearnDash logic ‘sees’ it.
Then, when LearnDash sees the value, it is set to whatever you set it to.
See that the value in the database remains intact.
This is useful in case you want to enable or disable the Focus Mode globally and then virtually enable or disable it on a course-by-course basis.
The next step is to define the condition that allows you to enable the focus mode on a specific course.
If you dive a little deeper into the dynamic filters, you’ll find another one called pre_option_{$option}.
You can use any of the two option_learndash_settings_theme_ld30 or pre_option_learndash_settings_theme_ld30.
The advantage of using pre_option_{$option} is that it is called before WordPress retrieves the option from the database. This prevents a database call and allows you to set whatever value you want for the option in a virtual sense.
The experiment examples below use the pre_option_{$option} dynamic filter.
The next advantage of using the pre_option_{$option} dynamic filter is that it loads early in the WordPress load cycle.
If you see from the details discussed previously, you need to modify the value before LearnDash even know about it.
You can prove that by building a function and hooking it into the template_redirect action.
It may be enough to play around with the post object and retrieve the post ID and the post type, then check if it belongs to a course, filter the focus_mode_enabled option.
By the time all that happens, LearnDash already retrieved the focus_mode_enabled option value from the WordPress database and is loading the course layout based on that value, either with Focus Mode enabled or disabled.
In other words, you are too late in the WordPress load cycle.
You need to stick with the pre_option_learndash_settings_theme_ld30 dynamic filter.
Returning to the condition to check for the specific course, you need to be aware that the Focus Mode in a course applies only to the steps inside that course.
When you enable Focus Mode in the LearnDash settings and go to the Single Course Page, you will only see the Focus Mode when you open any step on that course, either a Lesson, Topic, Quiz, Assignment, etc.
That means there is no straightforward way to say “Hey Focus Mode, please do not appear in this course”.
You’d need to check in the lesson if it belongs to the specific course you want to enable or disable the Focus Mode for, and then run your custom logic.
Thankfully, LearnDash provides a function called learndash_get_primary_course_for_step(), which does just that.
The function requires the step ID to be passed as a parameter. It then will return the ID of the course it belongs to.
You’d simply store the course ID in a variable, then evaluate the output of learndash_get_primary_course_for_step() with the course ID.
Now, you’d need a way to retrieve the current step ID to run the conditional.
That is an easy feat with get_the_ID().
The problem is that the pre_option_learndash_settings_theme_ld30 filter is ‘too early’ in the load cycle.
What this means is, on that stage of the load cycle, you cannot access the post object in WordPress as it has not loaded yet.
So, how can you use the good things of “both worlds” and put together the dynamic filter but use your custom condition to enable or disable Focus Mode?
You can extract information from the requested URL, like this
$request_uri=$_SERVER['REQUEST_URI'];
Then, you can get the post ID like this:
$post_id=url_to_postid($request_uri);
Now, you are good to make your condition. Let’s say you want to enable the Focus Mode for a course with ID 728. Your code would look something like this:
If you are curious like me, you may have realized that this gives you the power to enable or disable the Focus Mode on a single specific step only, let’s say, a specific lesson, topic, quiz, etc.
You’d change the condition to check if the current $post_id matches a specific ID.
You can additionally check if the current post’s post type is a lesson.
Remember to safely test this on a staging environment before committing changes to a live site.
I tested this on LearnDash 4.9.0.1, the latest version available.
How can you test it out too?
Go to demo.learndash.com, and spin up a new LearnDash Demo.
Then, go to LearnDash LMS > Courses and retrieve some IDs from courses and lessons.
With these IDs, go to Appearance > Theme Editor, locate the functions.php file of the active theme (Kadence), and start hacking around with the snippets on this article.
You have a course set to Closed access mode. That means users will purchase the course either through a third-party eCommerce like WooCommerce, or a membership plugin like Paid Memberships Pro.
Sweet.
When a visitor clicks the course from the course list, they are taken to the single course page by default. Then, they click the ‘Take this course’ call to action to go to the purchase page.
Too many steps.
What if you want to cut the process to click the course > go to checkout?
What if you want to prevent visitors from seeing the course content before enrolling?
What if you want both?
You need to redirect the user to the value you set in the Button URL field in your course access mode setting.
But how?
Interestingly, the solution is straightforward. The steps are as follows
Hook into the template_redirect action.
Check if the current post is a course.
Check if the current user is admin. //admin
Check if the current user is not enrolled in the current course.
The template_redirect action is fired before determining which template will be loaded. This is perfect to decide whether to allow the single course page to load, or redirect the user to our specific destination.
Create a function that will hold all the logic for this feature. I’ll call it obi_closed_course_reditect().
functionobi_closed_course_reditect(){//Code will go here}
Then hook the function into the template_redirect action:
Good. Your function is now hooked into the template_redirect action. As it doesn’t have any logic yet, nothing will happen.
2 – Check if the current post is a course.
Courses in LearnDash are defined with the ‘swfd-courses’ post type. The get_post_type() function allows you to retrieve the current post’s post type.
Set a conditional to check if the post is not a course. If true, return false.
if('sfwd-courses'!=get_post_type()){return}
3 – Check if the current user is admin.
You are only interested in redirecting a user if they are non-logged-in visitors or regular users on your website but have not enrolled in your course yet.
You can achieve this by checking the user by their current capabilities. A unique capability for admins is ‘manage_options’. Then, filter users out like this:
if (current_user_can('manage_options'){
     return
}
if(current_user_can('manage_options'){return}
4 – Check if the current user is not enrolled in the current course.
Give a current enrollee access to the single course page. LearnDash provides a function to check the current user enrollment status: ld_course_check_user_access().
5 – Retrieve the course options (serialized array).
The course options are stored in the database as metadata of the course post. The relevant meta key is ‘_sfwd-courses’. Use the get_post_meta() function to retrieve the course options and store them in a variable.
The course options are stored in the $courseOptionsSerialized variable as a serialized array.
You can access any option within the array by key. The course access mode is stored in the database as course price type. You can get this value like this